In WEB CONFIG....
SYNTAX
<add name="ConnectionStringName" connectionString=YourServer"; Initial Catalog=YourDB; Integrated Security=True"/>
EXAMPLE :
<connectionStrings>
<add name="Con" connectionString="data source=.\SQLEXPRESS;Integrated Security=SSPI;AttachDBFilename=|DataDirectory|\aspnetdb.mdf;User Instance=true" providerName="System.Data.SqlClient"/>
</connectionStrings>
We can use this connection string in our project.....
1.First Method
SqlConnection con = new SqlConnection("data source=.\SQLEXPRESS;Integrated Security=SSPI;AttachDBFilename=|DataDirectory|\aspnetdb.mdf;User Instance=true" );
SqlCommand cmd = new SqlCommand("Write your sql query here eg. select * from Table name");
con.Open();
DataSet ds = new DataSet(cmd,con);
SqlDataAdapter da = new SqlDataAdapter();
da.Fill(ds);
con.Close();
2.2nd method
<connectionStrings>
<add name="ConnectionStringName" connectionString="Data Source=localhost\sqlexpress;Initial Catalog=DatabaseName;User ID=username;Password=password" providerName="System.Data.SqlClient"/>
</connectionStrings>
Add a Class File
using System;
using System.Configuration;
using System.Data;
using System.Data.SqlClient;
public class WFDFeedsNews
{
SqlConnection con=new SqlConnection();
SqlCommand cmd=new SqlCommand();
public createConnection()
{
con = new SqlConnection(ConfigurationManager.ConnectionStrings ["connectionStringName"].ConnectionString);
}
public insertData(int id,string name)
{
con.Open();
try
{
cmd = new SqlCommand();
cmd.Connection = con;
cmd.CommandText = "INSERT INTO (userID, HeadLine)
VALUES (@id,@headline)";
cmd.Parameters.AddWithValue("@id",id);
cmd.Parameters.AddWithValue("@headline",name);
int result=con.executeNonQuery();
}
catch (Exception ex)
{
}
finally
{
con.Close();
}
}
}
}
Pass data from aspx page to this code...
Deployment
There are two categories of ASP.Net deployment:
- Local deployment – in this case the entire application is contained within a virtual directory and all the contents and assemblies are contained within it and available to the application.
- Global deployment – in this case, assemblies are available to every application running on the server.
There are different techniques used for deployment, however, we will
discuss the following most common and easiest ways of deployment:
- XCOPY deployment
- Copying a Website
- Creating a set up project
XCOPY Deployment:
XCOPY deployment means making recursive copies of all the files to
the target folder on the target machine. You can use any of the commonly
used techniques:
- FTP transfer
- Using Server Management tools providing replication on a remote site
- MSI installer application
XCOPY deployment simply copies the application file to the production
server and set a virtual directory there. You need to set a virtual
directory using the Internet Information Manager Microsoft Management
Consol (MMC snap-in).
Copying a Website:
The Copy Web Site option is available in Visual Studio. It is
available from the Website --> Copy Web Site menu option. This menu
items allows copying the current web site to another local or remote
location. It is a sort of integrated FTP tool.
Using this option, you connect to the target destination, select the desired copy mode:
- Overwrite
- Source to Target Files
- Sync UP Source And Target Projects
Then proceed with copying the files physically. Unlike the XCOPY
deployment, this process of deployment is done from Visual Studio
environment. However, there are the following problems with both the
above deployment methods:
- You pass on your source code
- There is no pre-compilation and related error checking for the files
- The initail page load will be slow
Creating a Setup Project:
In this method you use Windows Installer and package your web
applications so it is ready to deploy on the production server. Visual
Studio allows you to build deployment packages. Let us test this on one
of our existing project, say the data binding project.
Open the project and take the following steps:
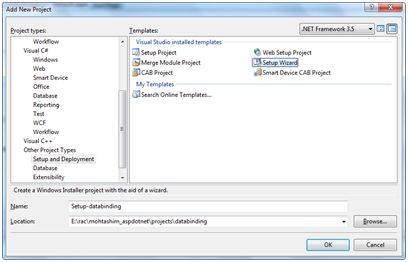
Step (1): Select File -> Add-> New Project with the website root directory highlighted in the Solution Explorer.
Step (2): Select Setup and Deployement, under Other Project Types. Select Setup Wizard.
Step (3): Choosing the default location ensures that the set
up project will be located in its own folder under the root directory of
the site. Click on okay to get the first splash screen of the wizard.
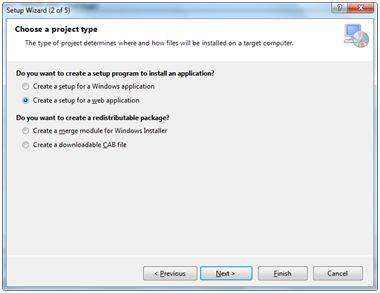
Step (4): The second screen asks to choose a project type. Select 'Create a setup for a web application'.
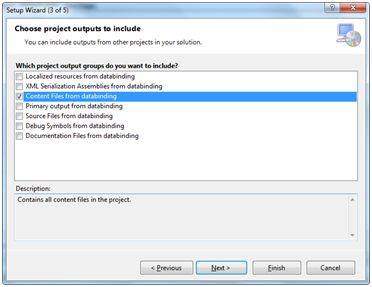
Step (5): Next, the third screen asks to choose project
outputs from all the projects in the solution. Check the check box next
to 'Content Files from...'
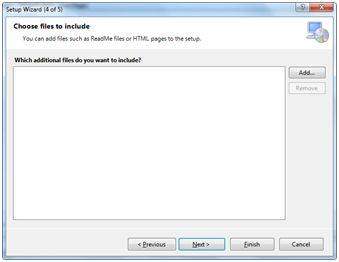
Step (6): The fourth screen allows including other files like ReadMe. However, in our case there is no such file. Click on finish.
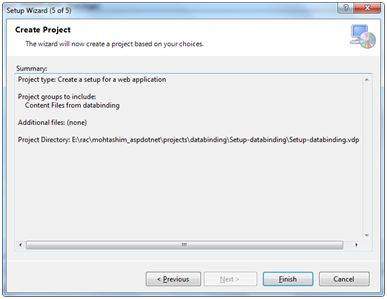
Step (7): The final screen displays a summary of settings for the set up project.
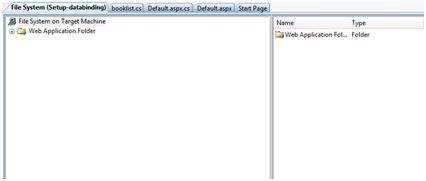
Step (8): The Set up project is added to the Solution Explorer and the main design window shows a file system editor
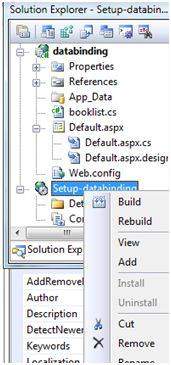
Step (9): Next step is to build the setup project. Right–click on the project name in the Solution Explorer and select Build.
Step (10): When build is completed, you get the following message in the Output window:
Two files are created by the build process:
- Setup.exe
- Setup-databinding.msi
You need to copy these files to the server and double-clicking the
setup file will cause the content of the .msi file to be installed on
the local machine.
Microsoft SQL Server Data Tools ...
Tools>Connect to Database


No comments:
Post a Comment